# Managing Workspaces
> Learn how to create, edit, delete, and configure your Workspaces.
This guide walks you through the practical steps of managing your Workspaces. Here, you'll learn how to create, edit, and delete Workspaces, as well as how to manage access by assigning teams and resources like Environments, Designs, and Views to them.
If you're new to the concept of Workspaces, we recommend starting with the [Workspaces Overview](/cloud/concepts/spaces/workspaces/) to understand what a Workspace is and how it relates to key components like Environments, Designs, and Teams.
A Note on Permissions
Every action described in this guide is governed by roles and permissions. To see a detailed breakdown of what your assigned role allows you to do, please refer to the
Default Permissions documentation.
### View Workspaces
The [Workspaces page](https://cloud.layer5.io/spaces/workspaces) is where you can see all of the workspaces within the currently selected organization.
> To suit different workflows, you can switch between two distinct layouts: a visual [grid view](#grid-view) and a detailed [table view](#table-view).
#### Grid View
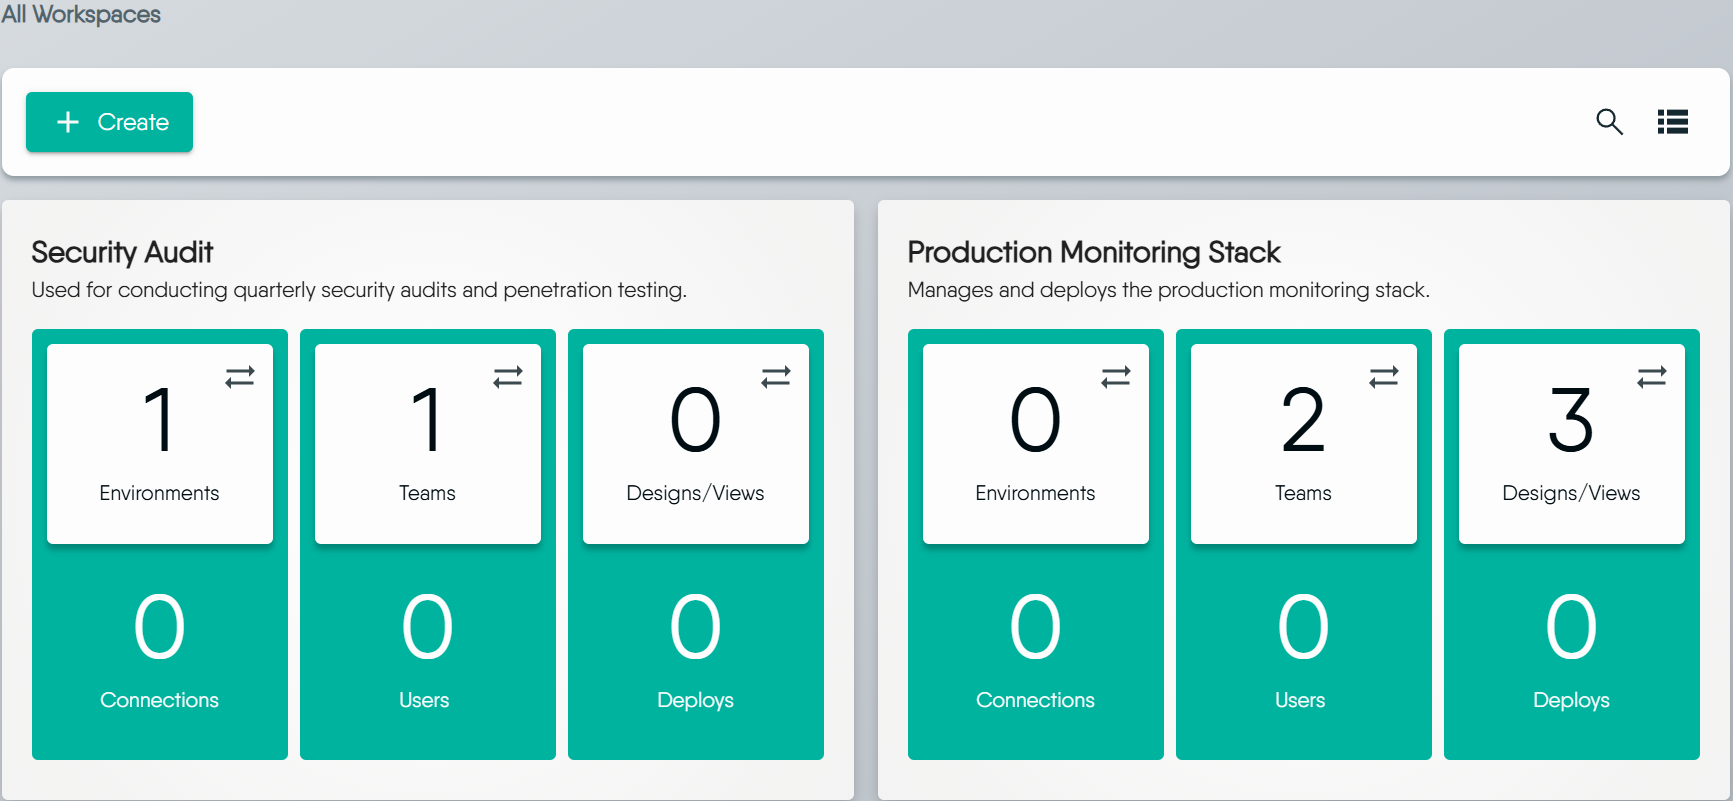
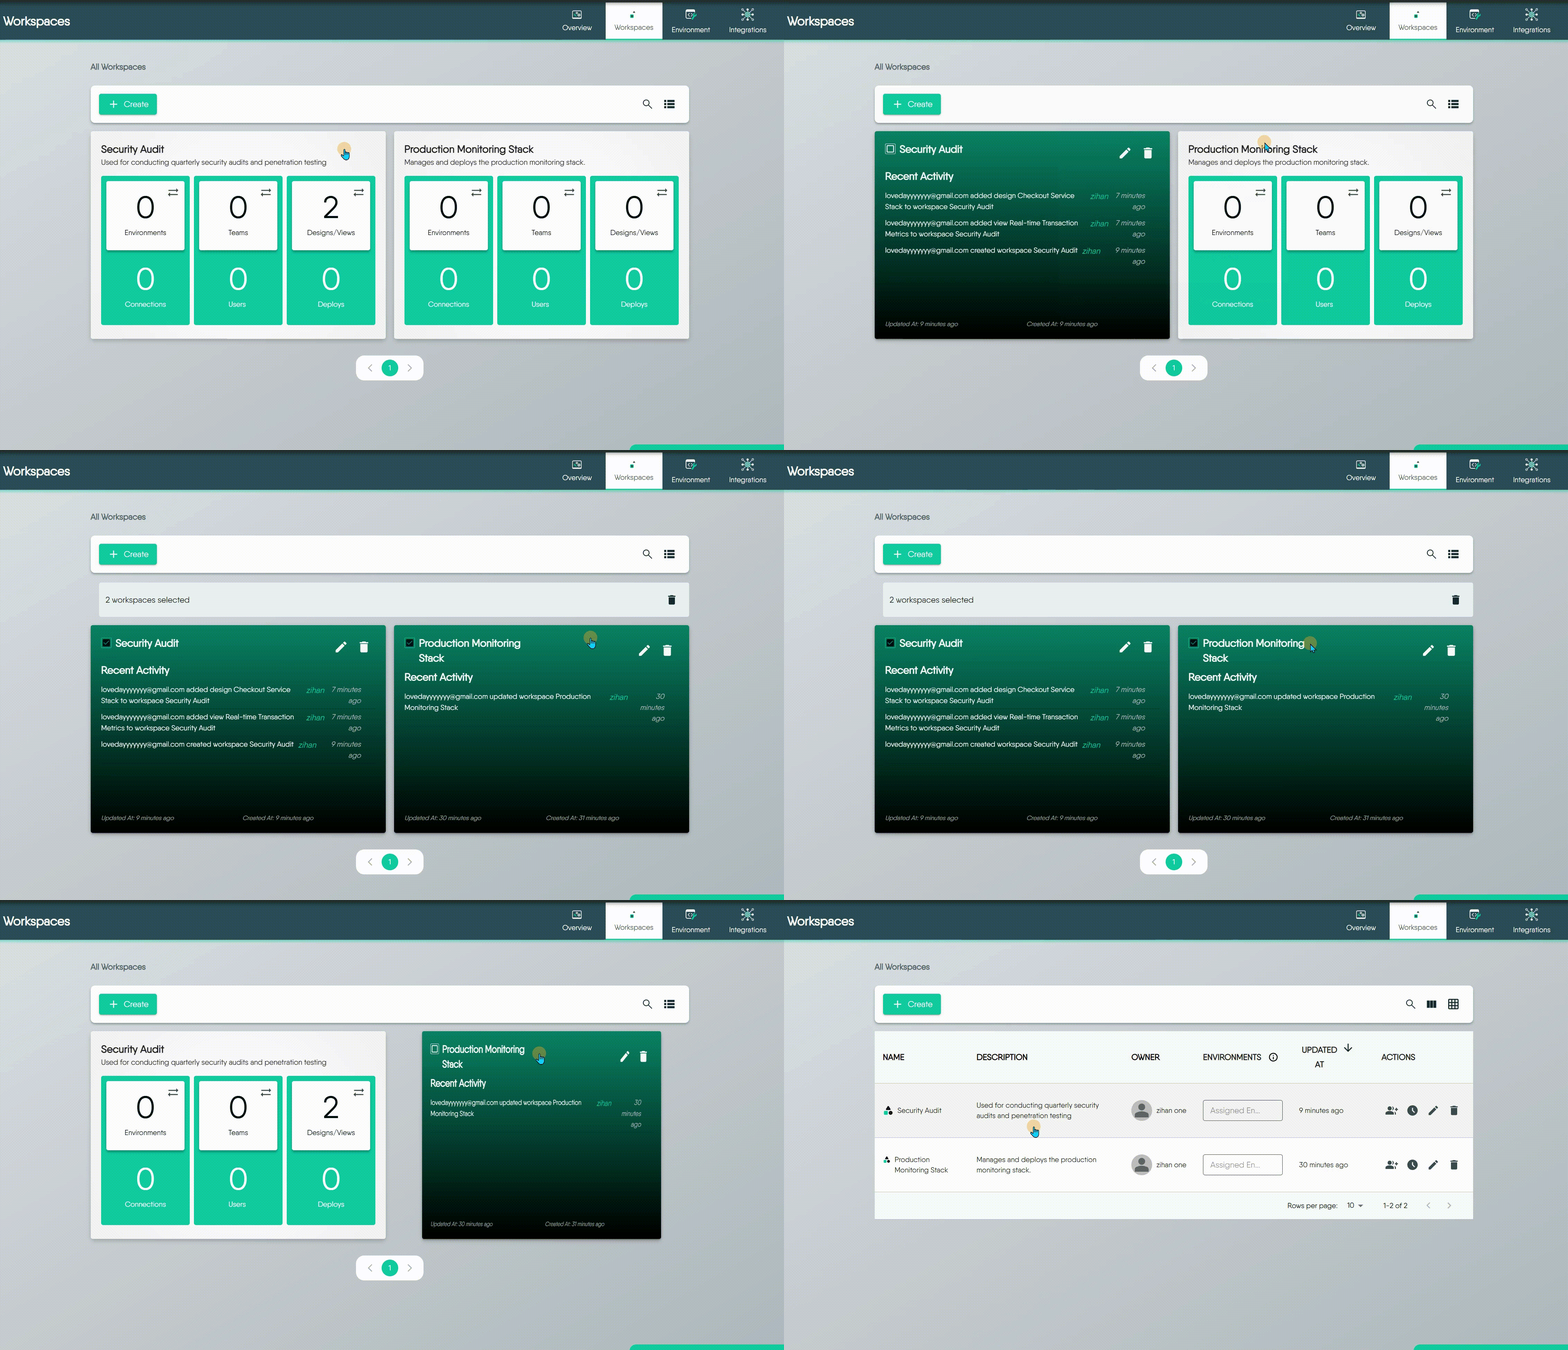
The grid view offers a card-based layout, perfect for quickly identifying workspaces at a glance. Each card displays essential information, and you can flip it to reveal management options like editing or deleting and get audit history.
#### Table View
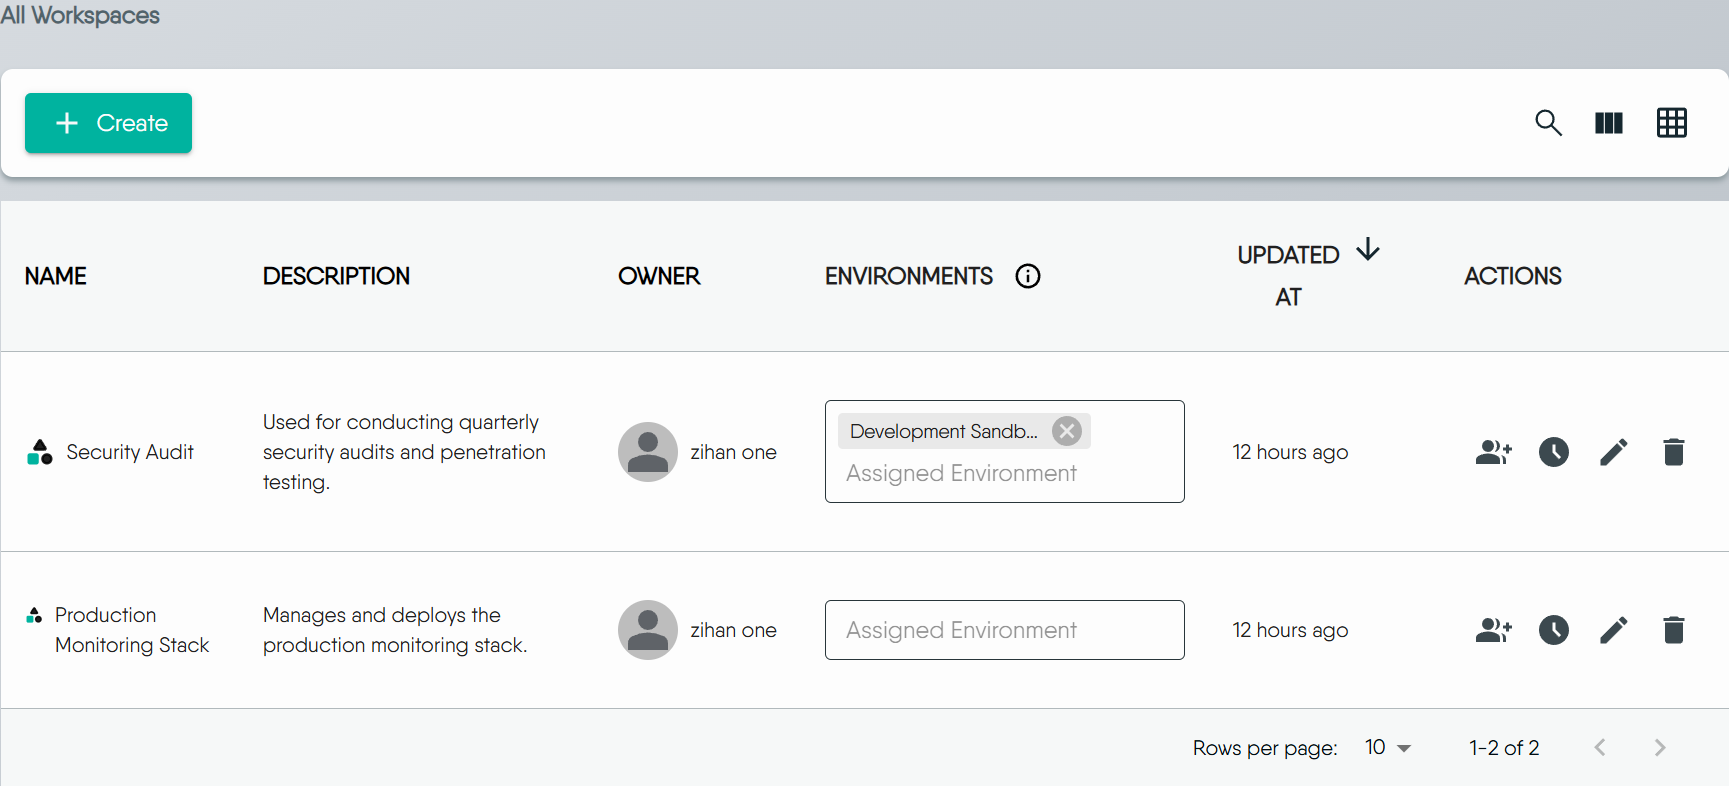
The table view provides a dense, list-based format that is ideal for managing a large number of workspaces. This view allows for sorting and gives you more control over the specific details you see.
To customize the information displayed, click the **View Columns** icon and select the attributes you want to see, such as Owner ID or Created Date.
Consistent Actions Across Views
Both the grid and table views provide the same set of management capabilities. You can choose the layout that best fits your needs without losing any functionality.
### Create a Workspace
Creating a new workspace allows you to manage resources, and define team access.
Permissions Required
Only users with the Workspace Admin or Organization Admin role can create new workspaces.
To create a workspace:
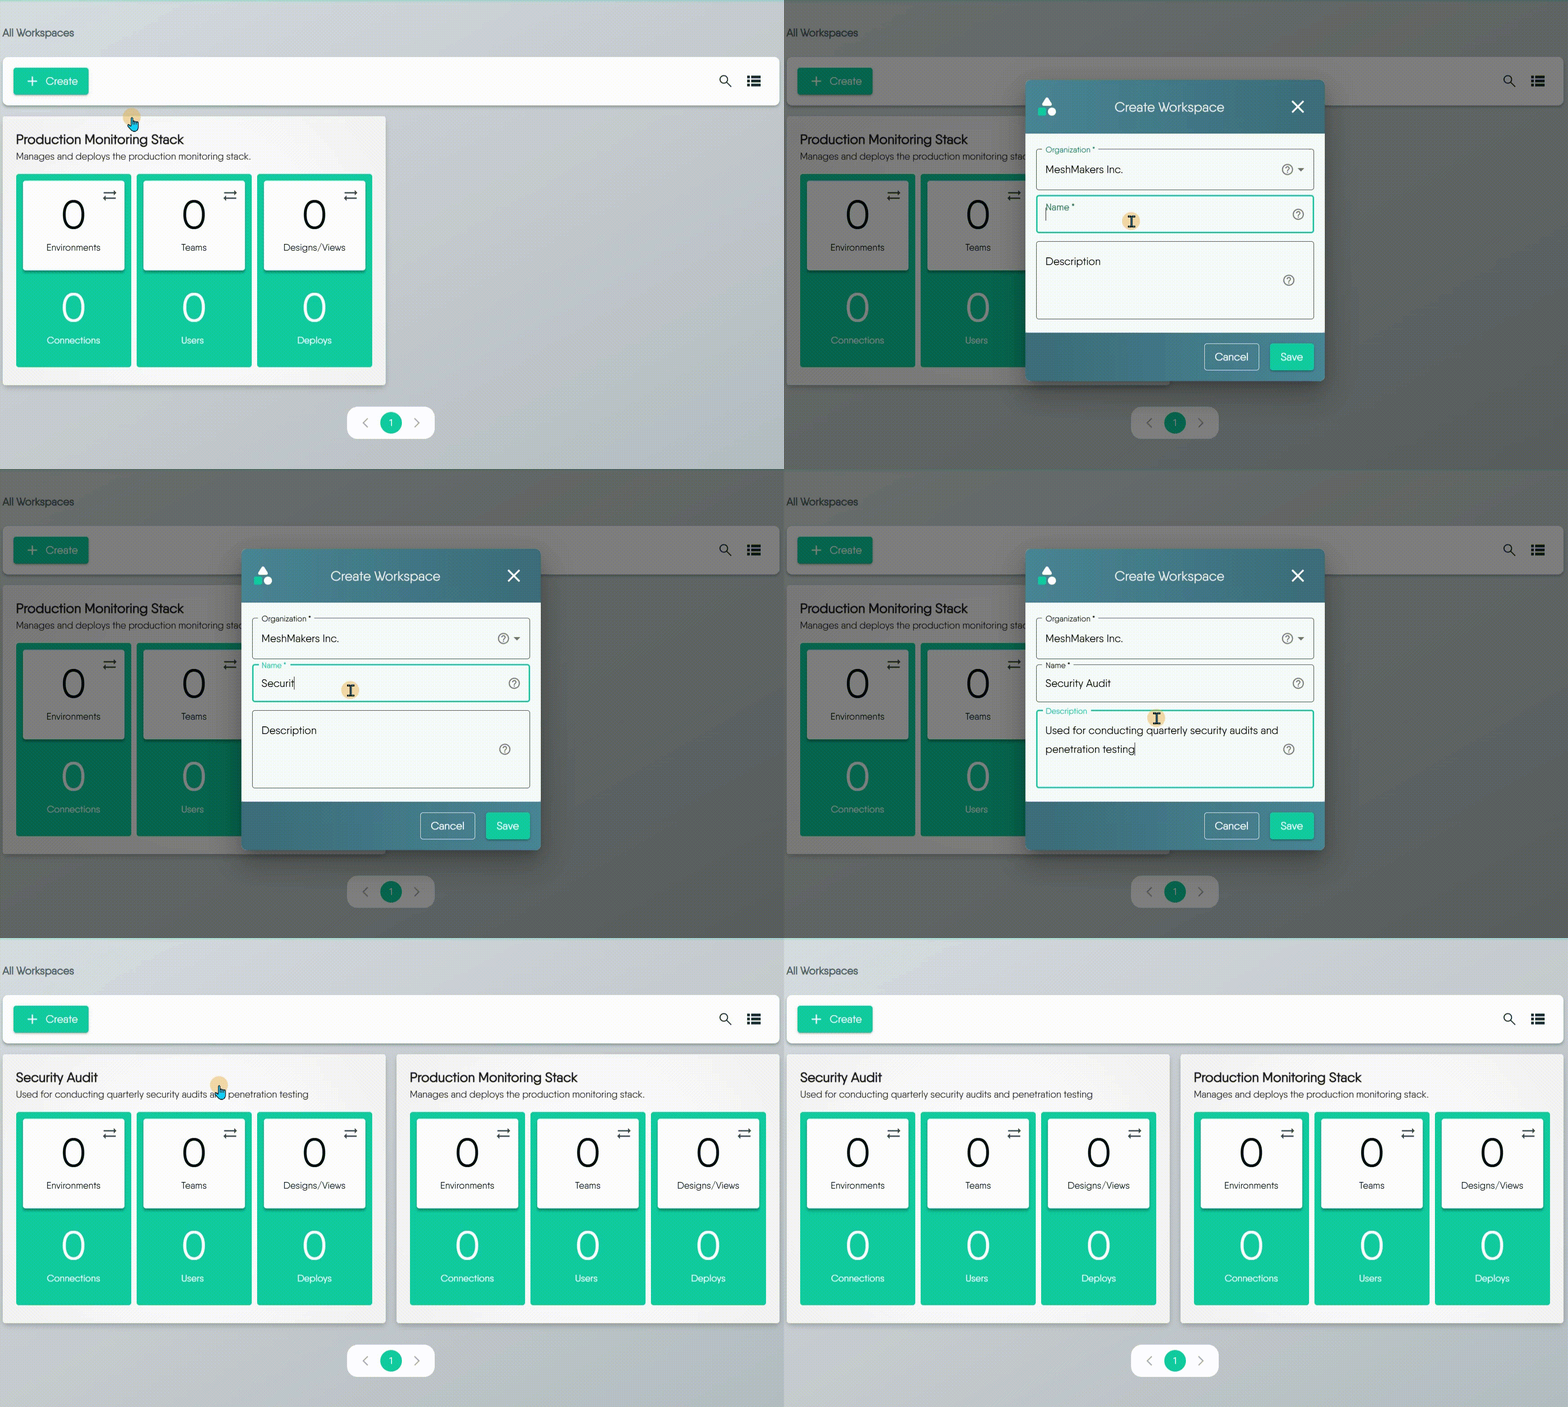
1. Click the **+ Create** button to open the creation Dialog.
2. From the dropdown menu, select the **Organization** that will own the new workspace. The chosen Organization **cannot be** changed after the workspace is created. Please select carefully.
3. Enter a descriptive **Name** and an optional **Description**, then click **Save**.
4. Your new workspace will now appear on the page.
### Edit a Workspace
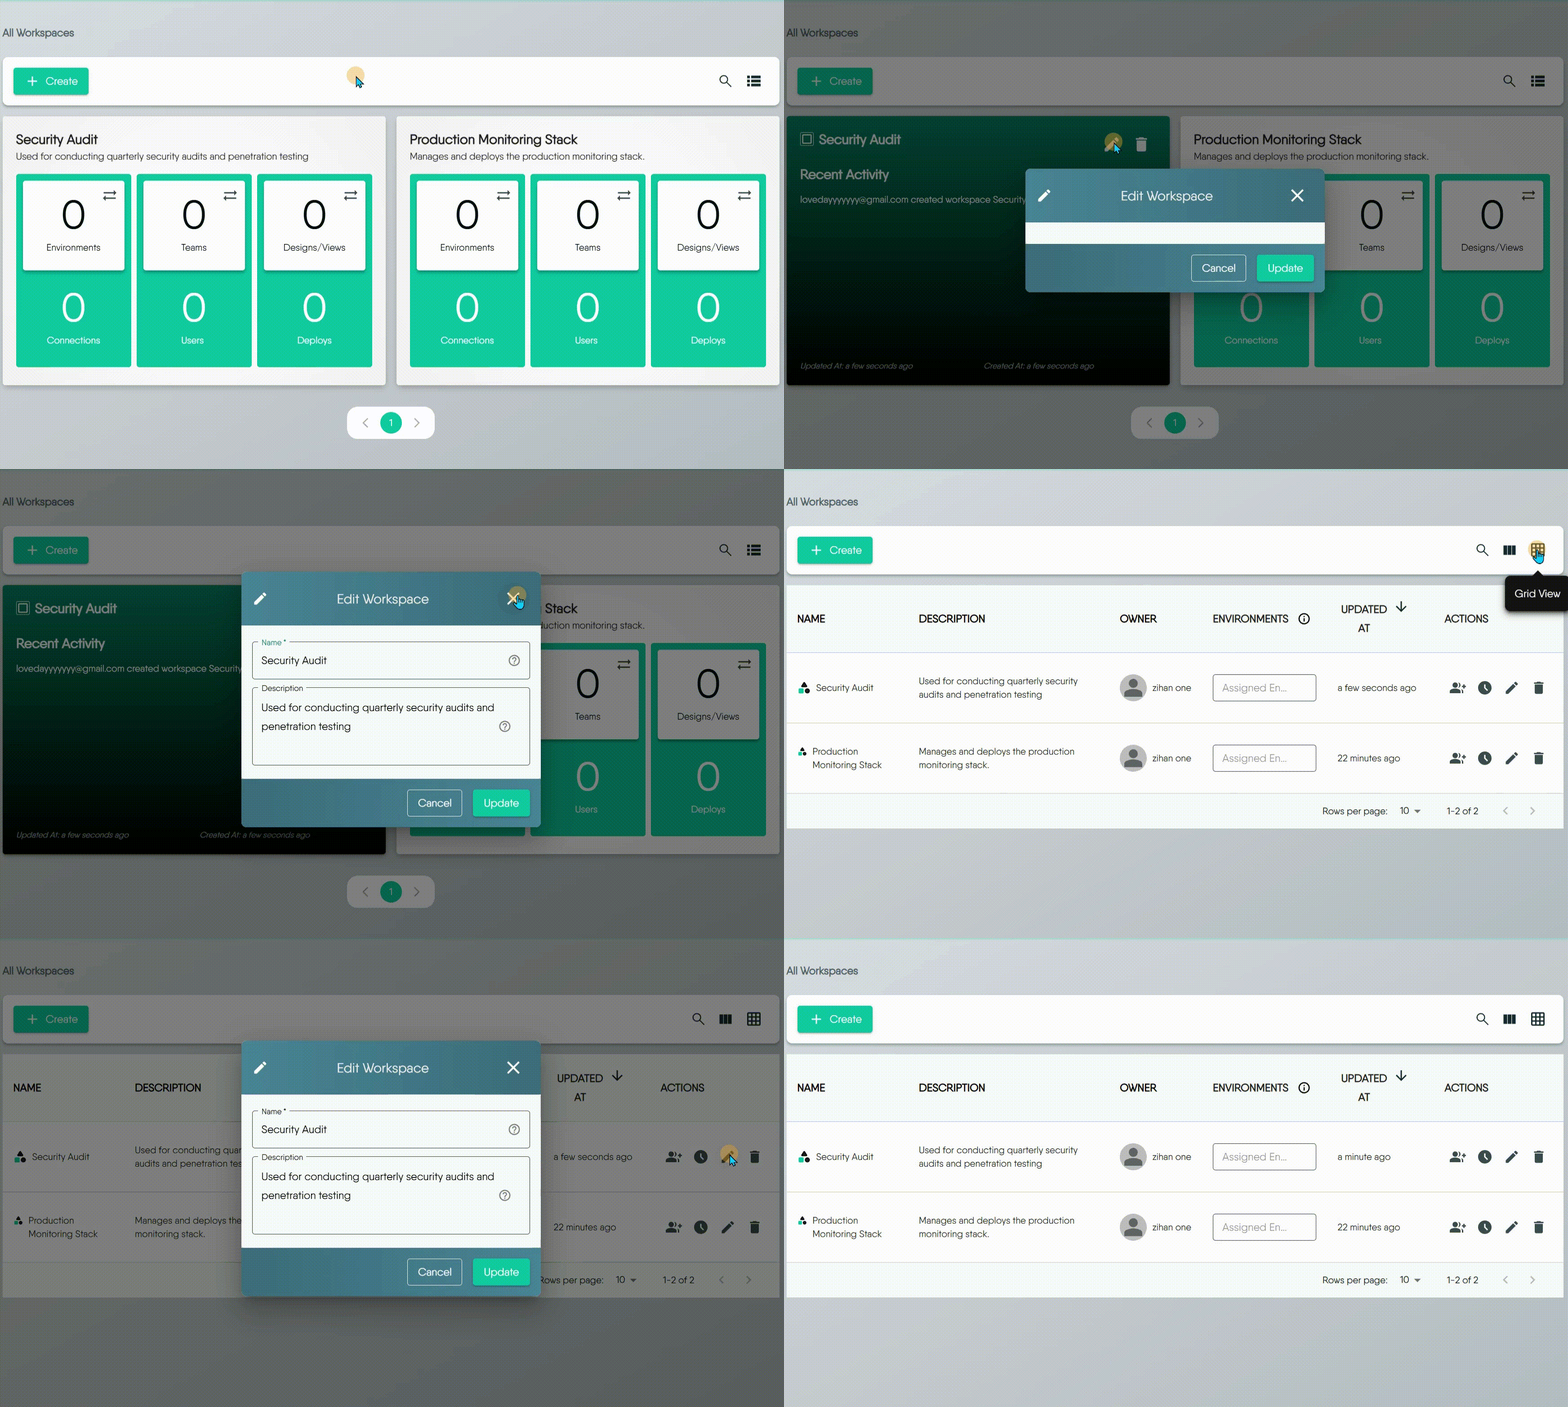
You can modify a workspace's name and description at any time after it has been created.
- **From the Grid View:** Flip the workspace card, then click the **pencil icon**.
- **From the Table View:** Click the **pencil icon** in the row of the workspace you wish to modify.
### Delete a Workspace
You can delete a single workspace or multiple workspaces at once.
- **To delete a single workspace:**
- From the **Grid View**, flip the workspace card, then click the **trash can icon**.
- From the **Table View**, click the **trash can icon** in the row of the workspace you wish to delete.
- **To delete multiple workspaces (Grid View only):**
1. Select the checkboxes on the cards of the workspaces you want to delete.
2. Click the **Delete** button that appears at the top of the page.
Deletion Restrictions
Meshery requires at least one workspace to exist within an organization at all times, so you cannot delete the last remaining workspace.
#### Workspace Deletion Behavior
What Happens When a Workspace is Deleted?
Deleting a Workspace will permanently delete the Workspace itself and its associated Designs and Views.
When a Workspace is deleted:
- Deletion is **permanent and irreversible**. Proceed with caution.
- Before deletion, users have the option to transfer associated Designs and Views to another Workspace.
- If no transfer is made, all associated Designs and Views will be permanently deleted along with the Workspace[^1].
- Any associated Teams or Environments will be detached from the Workspace but will remain available for reassignment.
### Assign Teams to a Workspace
Assigning teams is the way you grant users access to a workspace. Once a team is assigned, its members can access all of the Designs, Views, and Environments linked to that workspace.
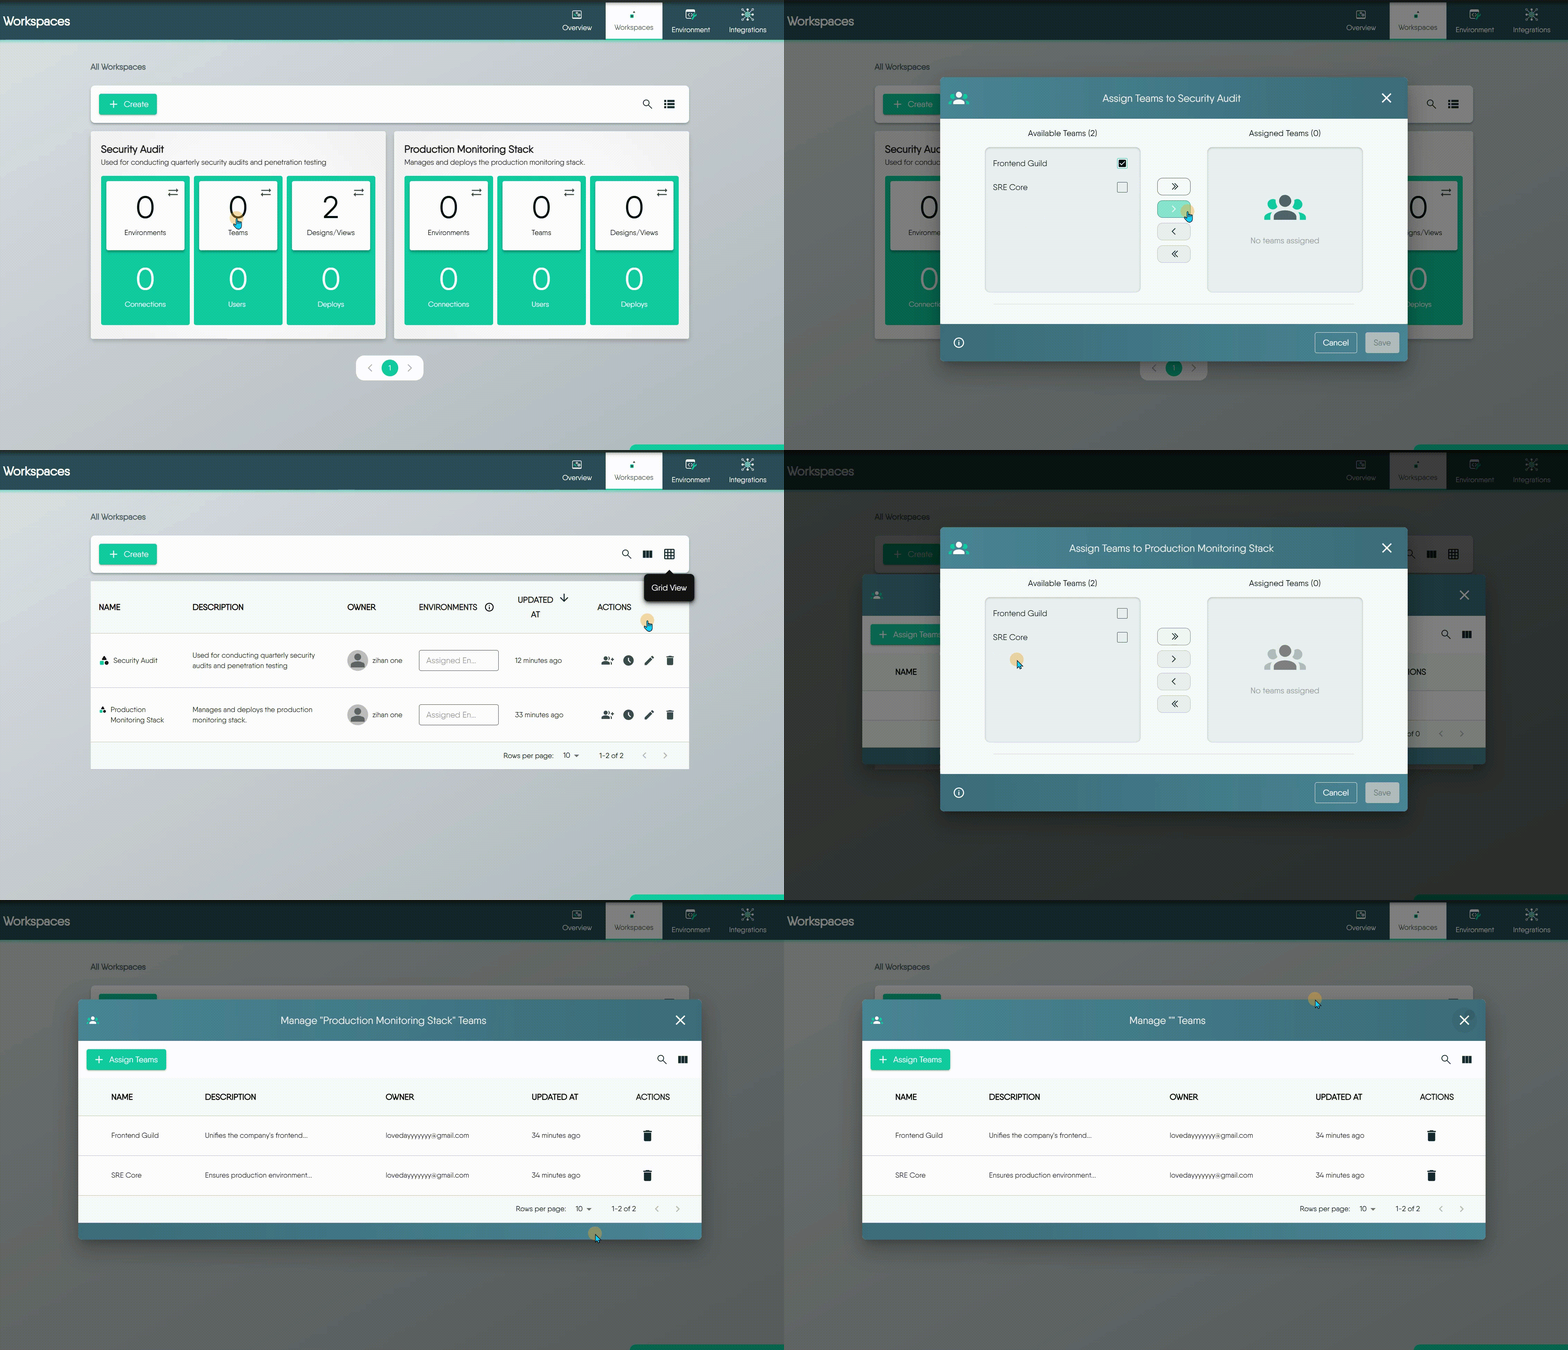
You can open the team management Dialog from either the grid or table view.
- **From the Grid View:** Click the **Teams** tile.
- **From the Table View:** Click the **Teams icon** in the workspace row. A list of currently assigned teams will appear. From there, click the **Assign Team** button to open the assignment Dialog.
Inside the assignment Dialog, you will see two lists: **Available Teams** on the left and **Assigned Teams** on the right.
1. Select one or more teams from either list.
2. Use the arrow buttons to move the selected teams between the lists:
- **>** Assigns a selected team.
- **<** Unassigns a selected team.
- **>>** Assigns all available teams.
- **<<** Unassigns all assigned teams.
3. Click **Save** to apply your changes.
Team and Workspace Relationships
You can assign multiple teams to a single workspace, and a single team can also be a member of multiple workspaces. This provides flexible access control across your projects. For more restrictions, see
Workspaces documentation.
### Link Environments to a Workspace
When you link an [Environment](/cloud/concepts/spaces/environments/) to a Workspace, you make all the connections (like those to Kubernetes clusters or databases) grouped within that Environment available. This means any team members with access to that Workspace can then deploy their applications or configurations to the resources.
The process of linking environments is almost the same as assigning teams.
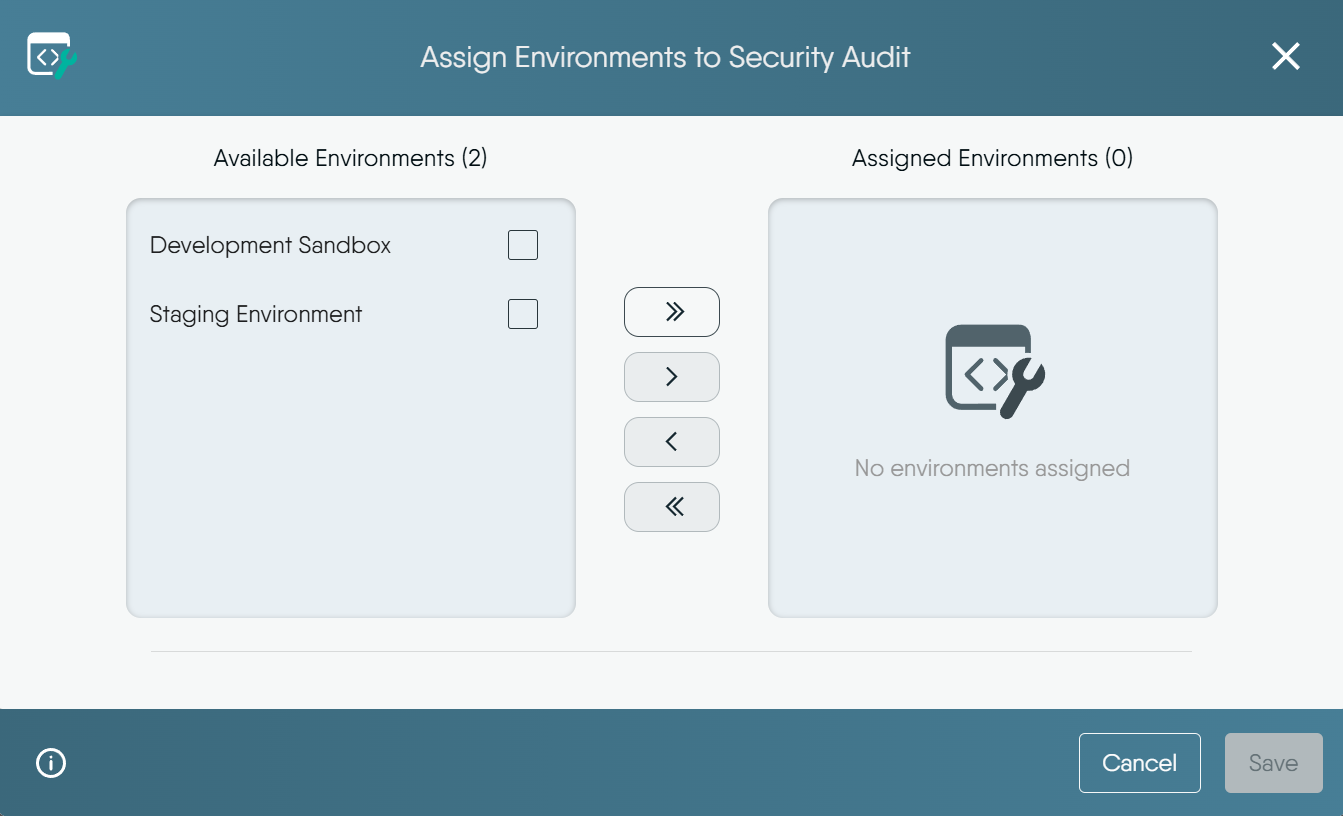
Opening the **Environments** tile is also how you see which Environments a Workspace currently draws on: the dialog's assigned list is that Workspace's Environments.
Many-to-Many Relationship
An Environment can be linked to multiple Workspaces, and a Workspace can have multiple Environments. This allows you to share common environments across different projects.
Managing the Environments Themselves
Creating an Environment, editing it, and choosing which Connections belong to it are done on the Environments page rather than here. See
Managing Environments.
### Move Designs and Views Between Workspaces
Unlike Environments, every Design and View **must belong to exactly one Workspace at all times.**
When you create a new Design, it is automatically added to your current Workspace. Therefore, you don't "link" them in the same way you link an Environment; instead, you **move** them from one Workspace to another.
#### How to Move a Design or View
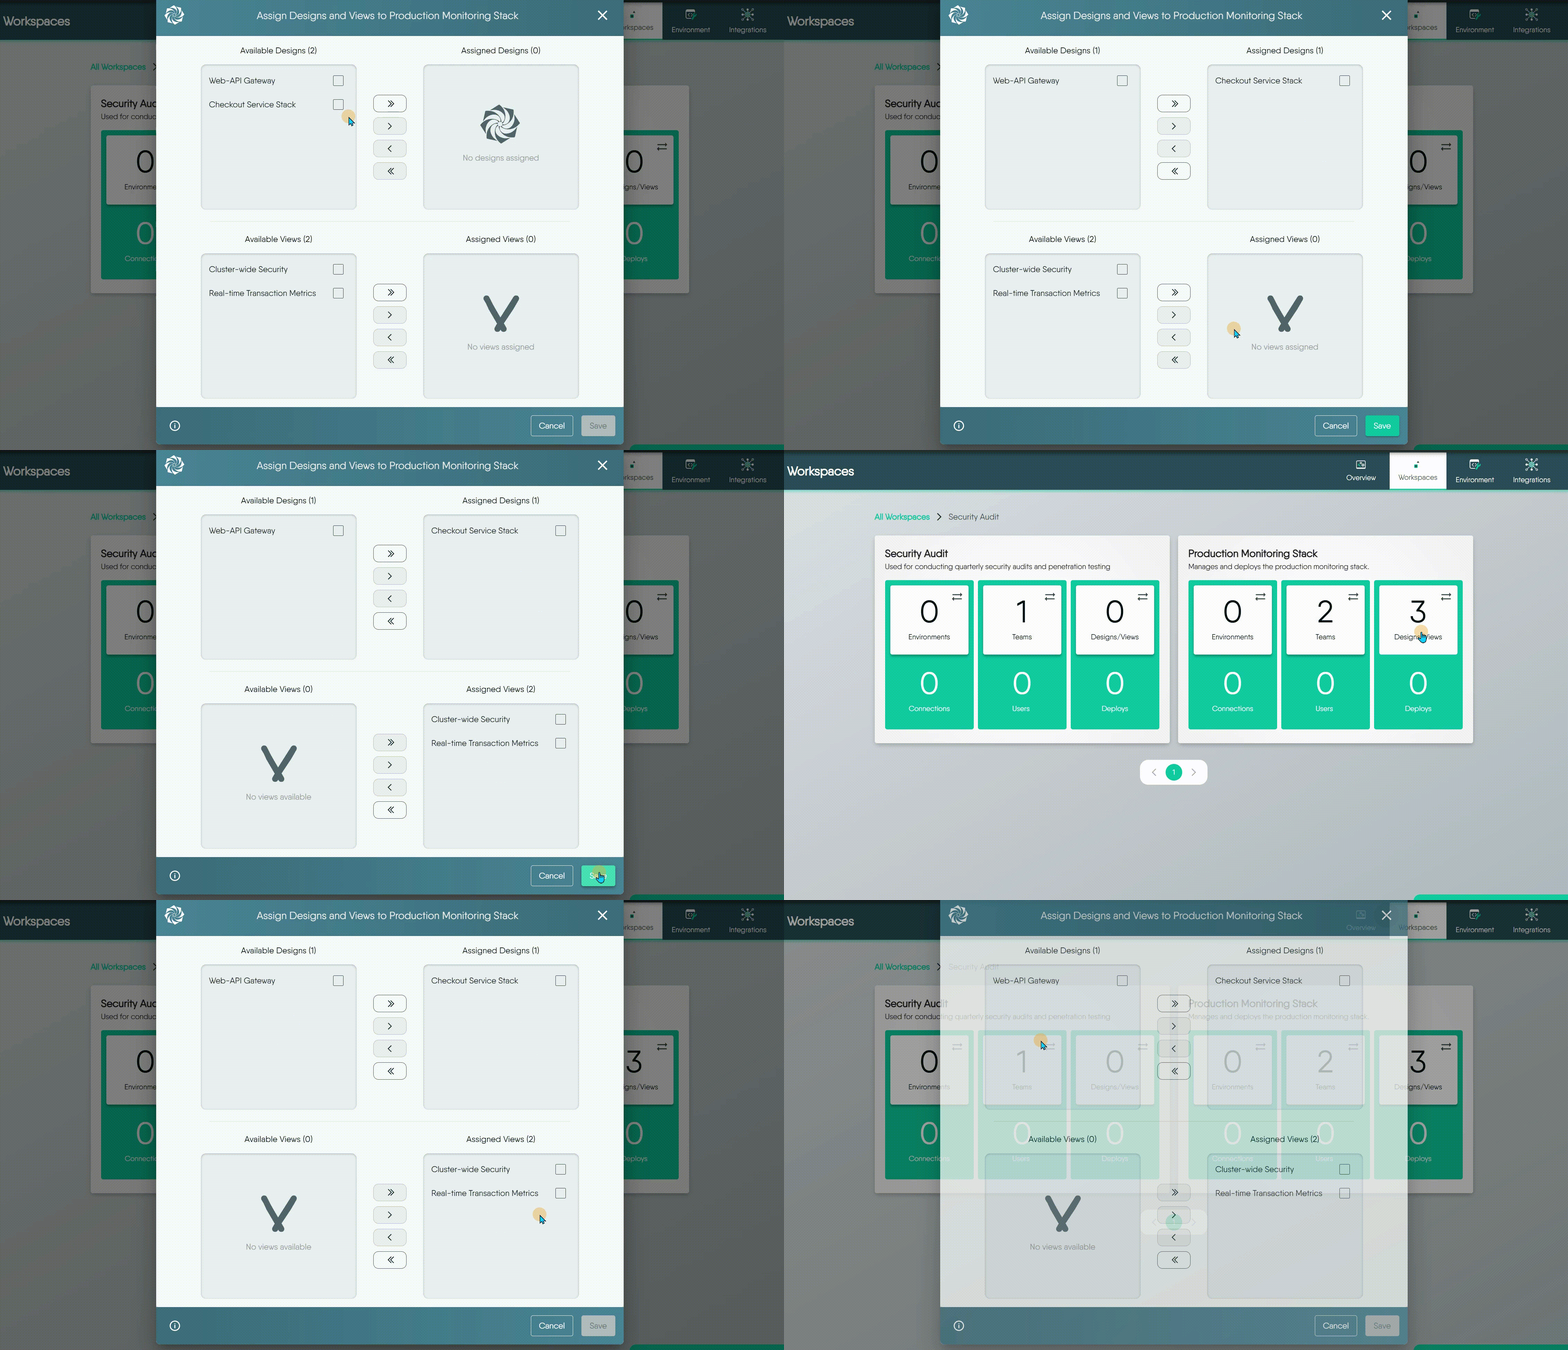
1. Click the **Designs/Views** tile on the Workspace card (or the equivalent icon in the table view) to open the management Dialog.
2. Inside the Dialog, select the Design(s) or View(s).
3. Use the arrow buttons to move the selected Design(s) or View(s) to the target workspace.
4. Click **Save**.
Exclusive Ownership
A Design or View can only exist in one Workspace at a time. Moving it to a new Workspace will automatically remove it from its original location. For more detailed information, see
Workspaces documentation.
### View Recent Activity
Meshery keeps a detailed audit log for each workspace, allowing you to track all significant events. This is useful for maintaining security and troubleshooting issues.
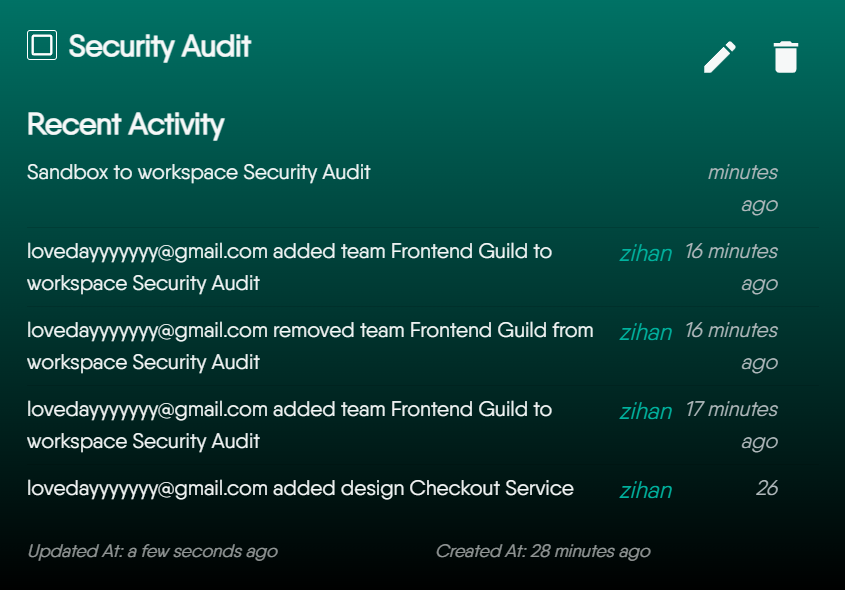
The activity log captures a variety of events, including:
- The creation or deletion of the workspace.
- Updates to the workspace's name or description.
- The assignment or unassignment of Teams.
- The linking or unlinking of Environments.
- The movement of Designs or Views between workspaces.
At the bottom of the log, you will also find timestamps for when the workspace was initially created and when it was last updated.
Putting It All Together: A Hands-on Guide
To see how managing a Workspace fits into a complete, end-to-end workflow, follow the
Using Workspaces Effectively learning path.
### Common Workspace Usage Patterns
There isn't a single "best" way to organize your workspaces, as structure depends heavily on team dynamics and project needs. Instead, we recommend a flexible, multi-layered approach to maximize workspace effectiveness. Below are common usage patterns:
**1. The Project Hub**
Dedicate a shared workspace to each project. It becomes a central hub where your team can co-develop designs, share reusable components, and align with specific environments (e.g., staging or production). This keeps all your environments, history, and resources in one place
**2. Your Personal "My Drive"**
Think of a private workspace as your personal Google "My Drive." You can use it for anything—from important, confidential designs to just playing around with new ideas in a "sandbox." It's more than just a place for quick tests; it's also where you can build and polish your professional work before it's ready to be shared.
**3. Template Library**
Create a separate, access-controlled Workspace to serve as your organization's internal, private template library. This is for storing non-public, organization-specific, or sensitive patterns.
> This practice complements the [public Catalog](/cloud/concepts/catalog/exploring-the-catalog/), which is used for sharing generic, non-sensitive designs with the community. A dedicated Organization Catalog feature is also planned for the future.
**4. The Team Space**
You can also organize long-term workspaces around specific teams, such as a "Developer Hub" or "QA Workspace." This simplifies resource management and makes it easy to monitor team-wide activity.
**5. The Environment-Specific Space**
For teams requiring strict separation between environments, this pattern is essential. You can create dedicated workspaces like a "Production Workspace," which would exclusively contain designs approved for deployment and link only to production clusters. This approach builds a secure barrier between your development, staging, and production assets.
### FAQ
#### 1. When a design is transferred from one Workspace to the next, is design ownership affected? Who has access? What if the Workspaces are in different orgs?
- **Ownership**: A Design’s ownership is permanent. It always belongs to the user account that created it.
- **Access**: Access to the Design is determined by the Teams assigned to its new Workspace.
- **Cross-Organization Transfers**: You can move a Design you own into a Workspace in a different Organization, provided you have the necessary permissions in the target Organization.
> A key restriction is that a user, even with a [Workspace Admin](/cloud/concepts/identity-and-security/roles/workspace-roles/) role, cannot manage a Design they **do not own**. This action requires [Organization Admin](/cloud/concepts/identity-and-security/roles/organization-roles/) or Organization Owner permissions.
#### 2. What can other users of a Workspace do with my design? Can they delete my design?
Other members of a Workspace can view and edit your Design, but they **cannot delete it**. The permission to delete a Design is exclusive to its **Owner**.
#### 3. Can Workspaces contain private, public, and published designs?
Yes. A Workspace can simultaneously contain Designs that are private, public, and published.
#### 4. How will I know if another user made changes to my design? Will I be notified? Is there an edit history or audit trail?
Currently, it is **not possible** to receive direct notifications or see a collaborative audit trail of changes made by other users. While a Version History feature exists for Designs, it currently only tracks changes made by you, not changes from other collaborators.
#### 5. If I share my private design with a user in a different org, can they share my design with other users?
No. A user with whom you share a private Design cannot re-share it with others.
> [learn more about sharing designs](/kanvas/designer/sharing/).
#### 6. Does a workspace have space limitations or file count limitations?
Currently, there are no specific space or file count limitations for Workspaces. However, this may be subject to change in the future and could be tied to different [subscription plans](https://layer5.io/pricing).
#### 7. How can I make my design publicly available, but read-only to other users?
To make a Design available to everyone but in a read-only state, you should **[Publish](/kanvas/designer/publishing-designs/)** it. A **Published** design can be viewed and cloned by any user, but the original cannot be edited by others.
#### 8. How do I share a private design with a specific team for collaboration?
To share a design exclusively with a select group:
1. First, ensure your Design's visibility is set to **Private**. This prevents anyone from accessing it by default.
2. Next, place the private Design into a **Workspace**.
3. Finally, assign a specific **Team** to that Workspace.
This grants members of the assigned Team exclusive access and the permission to edit the design.
[^1]: This functionality is not fully implemented yet. Users might occasionally observe that designs and views are preserved after Workspace deletion.