An organization’s open signup invitation can be set in two places: the invitation picker in Edit Organization, or the isDefault setting on the invitation itself.
The Edit Organization selection takes precedence. The isDefault marker is used when no selection has been made there, or when the invitation that selection points at no longer exists.
roles field on each invitation to ensure new members receive the correct initial permissions.
@company.com allow anyone with that domain. Verify ownership and pair with roles and teams that grant only necessary access.
expiresAt is not set, the invitation never expires. If quota is not set, the invitation has unlimited uses.
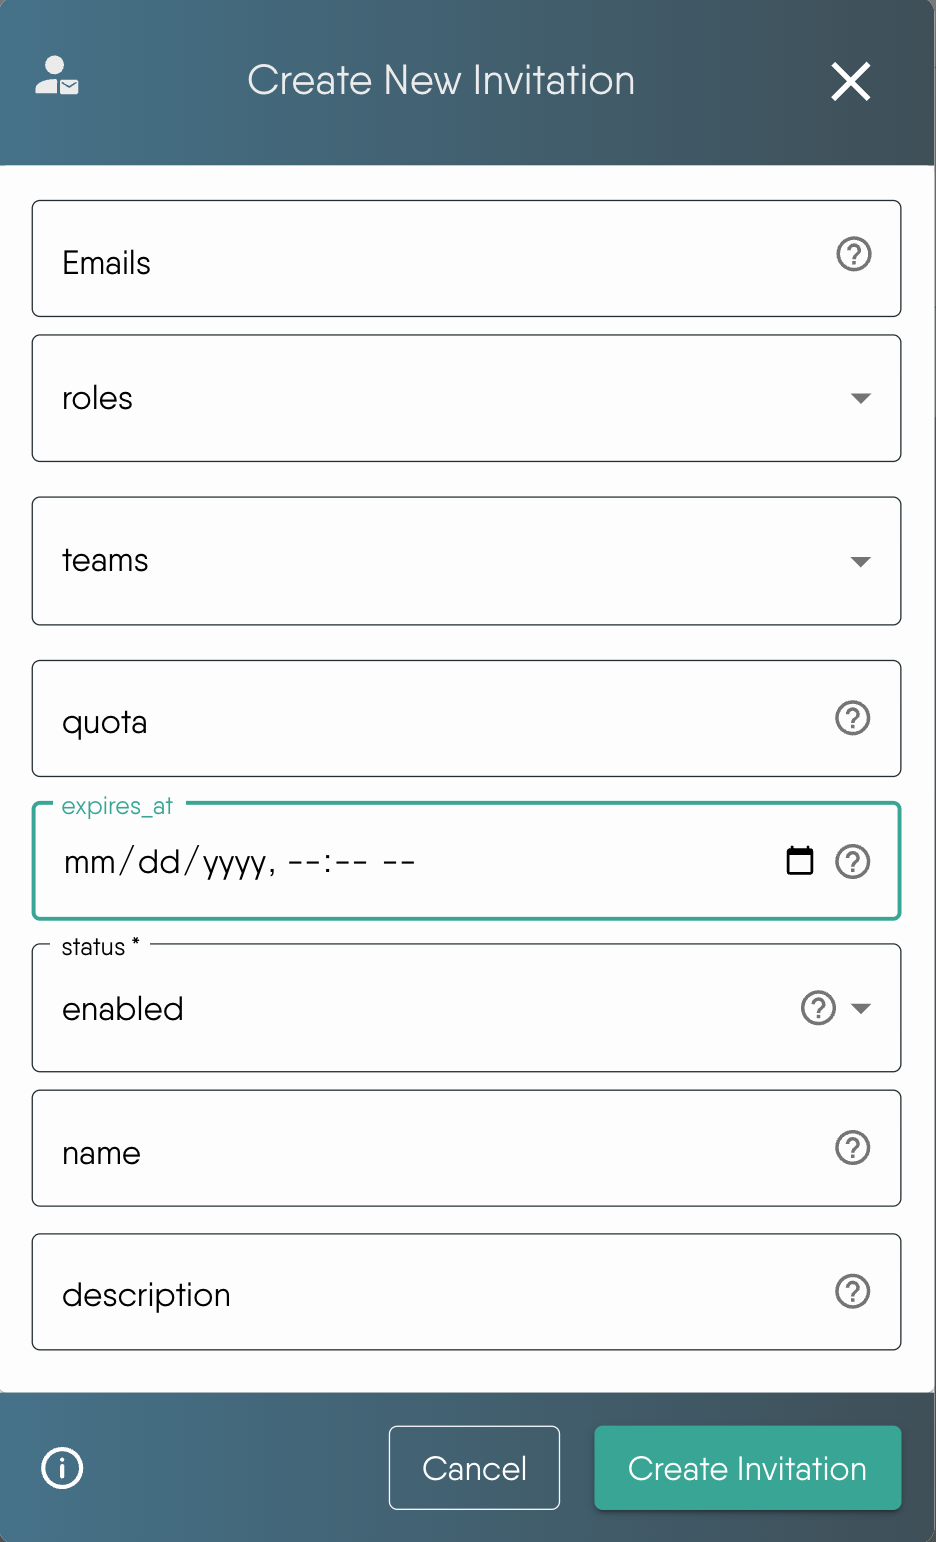
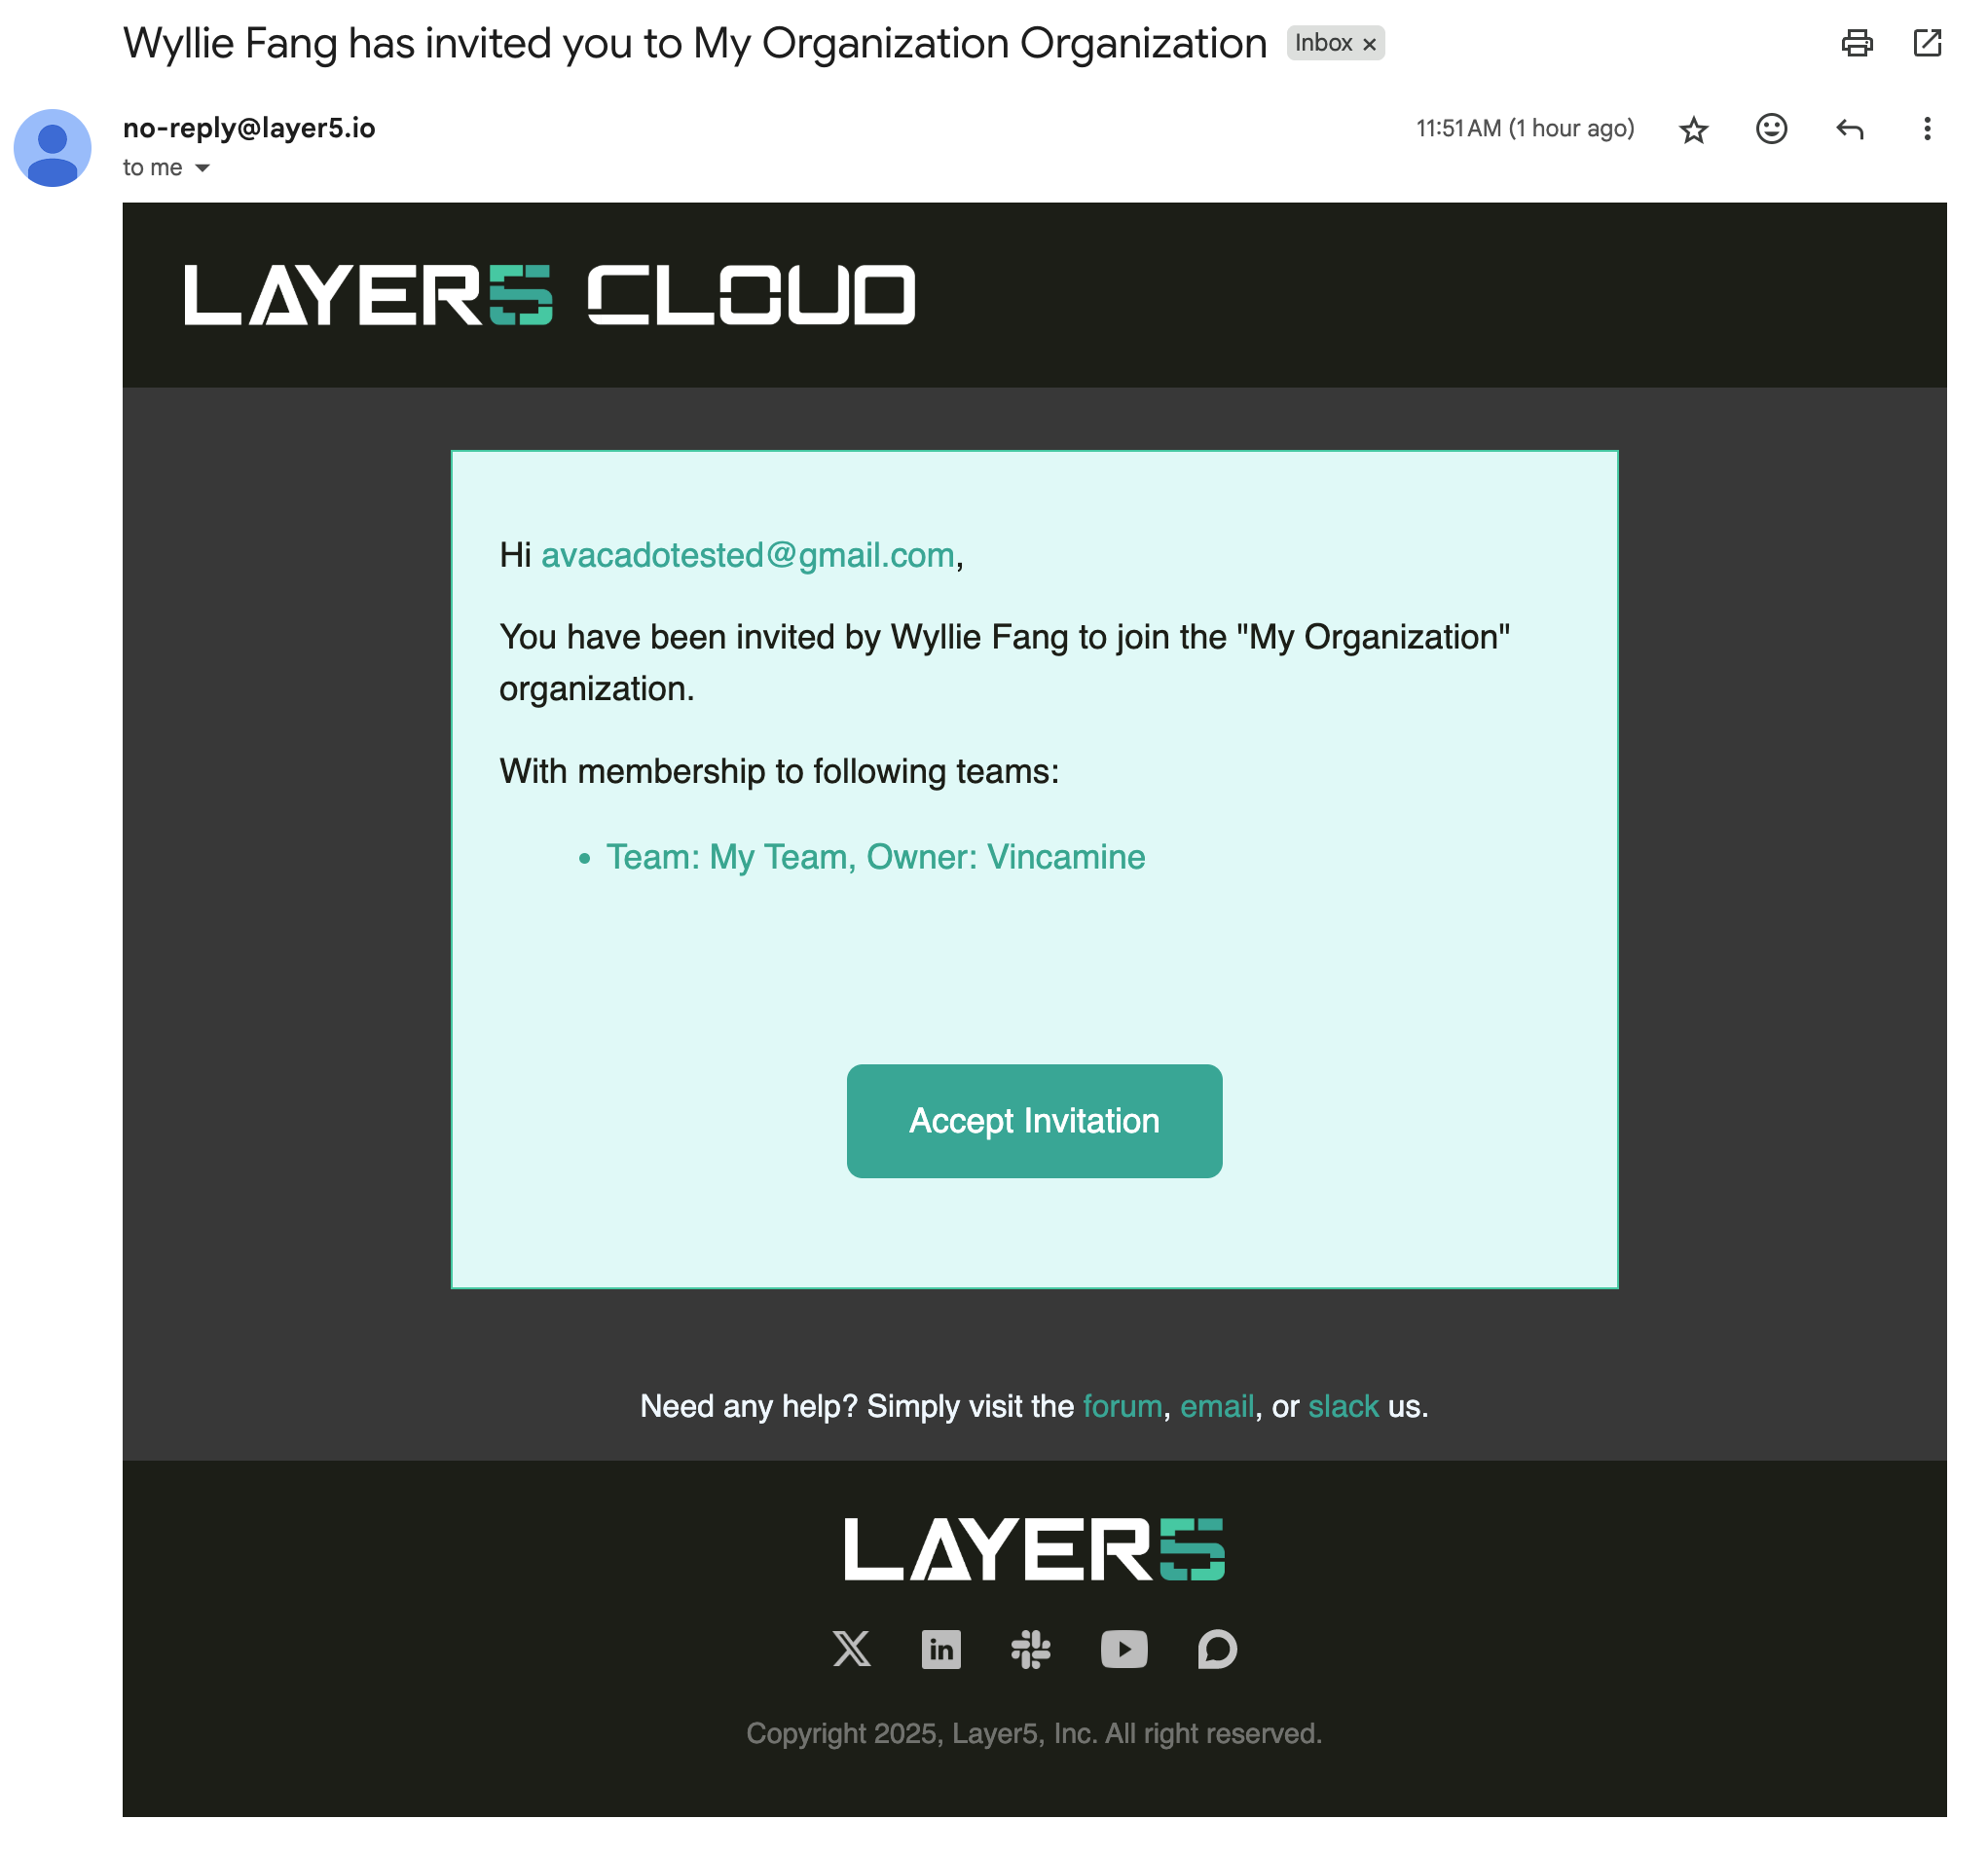
emails field that are exact email addresses. Domain-wide patterns (e.g., @layer5.io) and public invitations (empty emails field) do not trigger individual notification emails — share the invitation link directly in those cases.
 #### Invitation properties explained
| Property | Description |
| :--- | :--- |
| `emails` | List of email addresses or domain patterns allowed to use the invitation. Exact addresses (e.g., `user@example.com`) and domain patterns (e.g., `@example.com`) are both supported. If empty, the invitation is public. |
| `roles` | List of roles automatically assigned to new members upon accepting the invitation. If empty, the user joins with no role. |
| `teams` | List of teams new members are automatically added to upon accepting the invitation. |
| `quota` | Number that limits how many users can accept the invitation. If not set, there is no usage limit. |
| `expiresAt` | Date after which the invitation link can no longer be used. Does not affect existing members. If not set, the invitation never expires. |
| `status` | Invitation status: `enabled` = active and usable; `disabled` = inactive (can be re-enabled later). |
| `name` | A human-readable name used to identify the invitation. |
| `description` | Additional information about the invitation's purpose, for internal reference. |
| `isDefault` | When enabled, marks this invitation as the organization's open signup invitation. Users who register through your organization's registration page are automatically enrolled through this invitation, receiving the pre-configured roles and teams. Without a default invitation, the registration page does not automatically add users to the organization. Only one invitation can be designated as the default at a time — designating a new one clears the previous. Turning this setting on **or off** requires the **Manage Invitations** permission; editing any other property of an invitation does not, and leaves the setting as it was. |
### Managing existing invitations
All existing invitations are displayed in a table showing key details for each invitation: its name and description, a copyable acceptance link, the owner, expiration date, quota usage, assigned roles and teams, and current status.
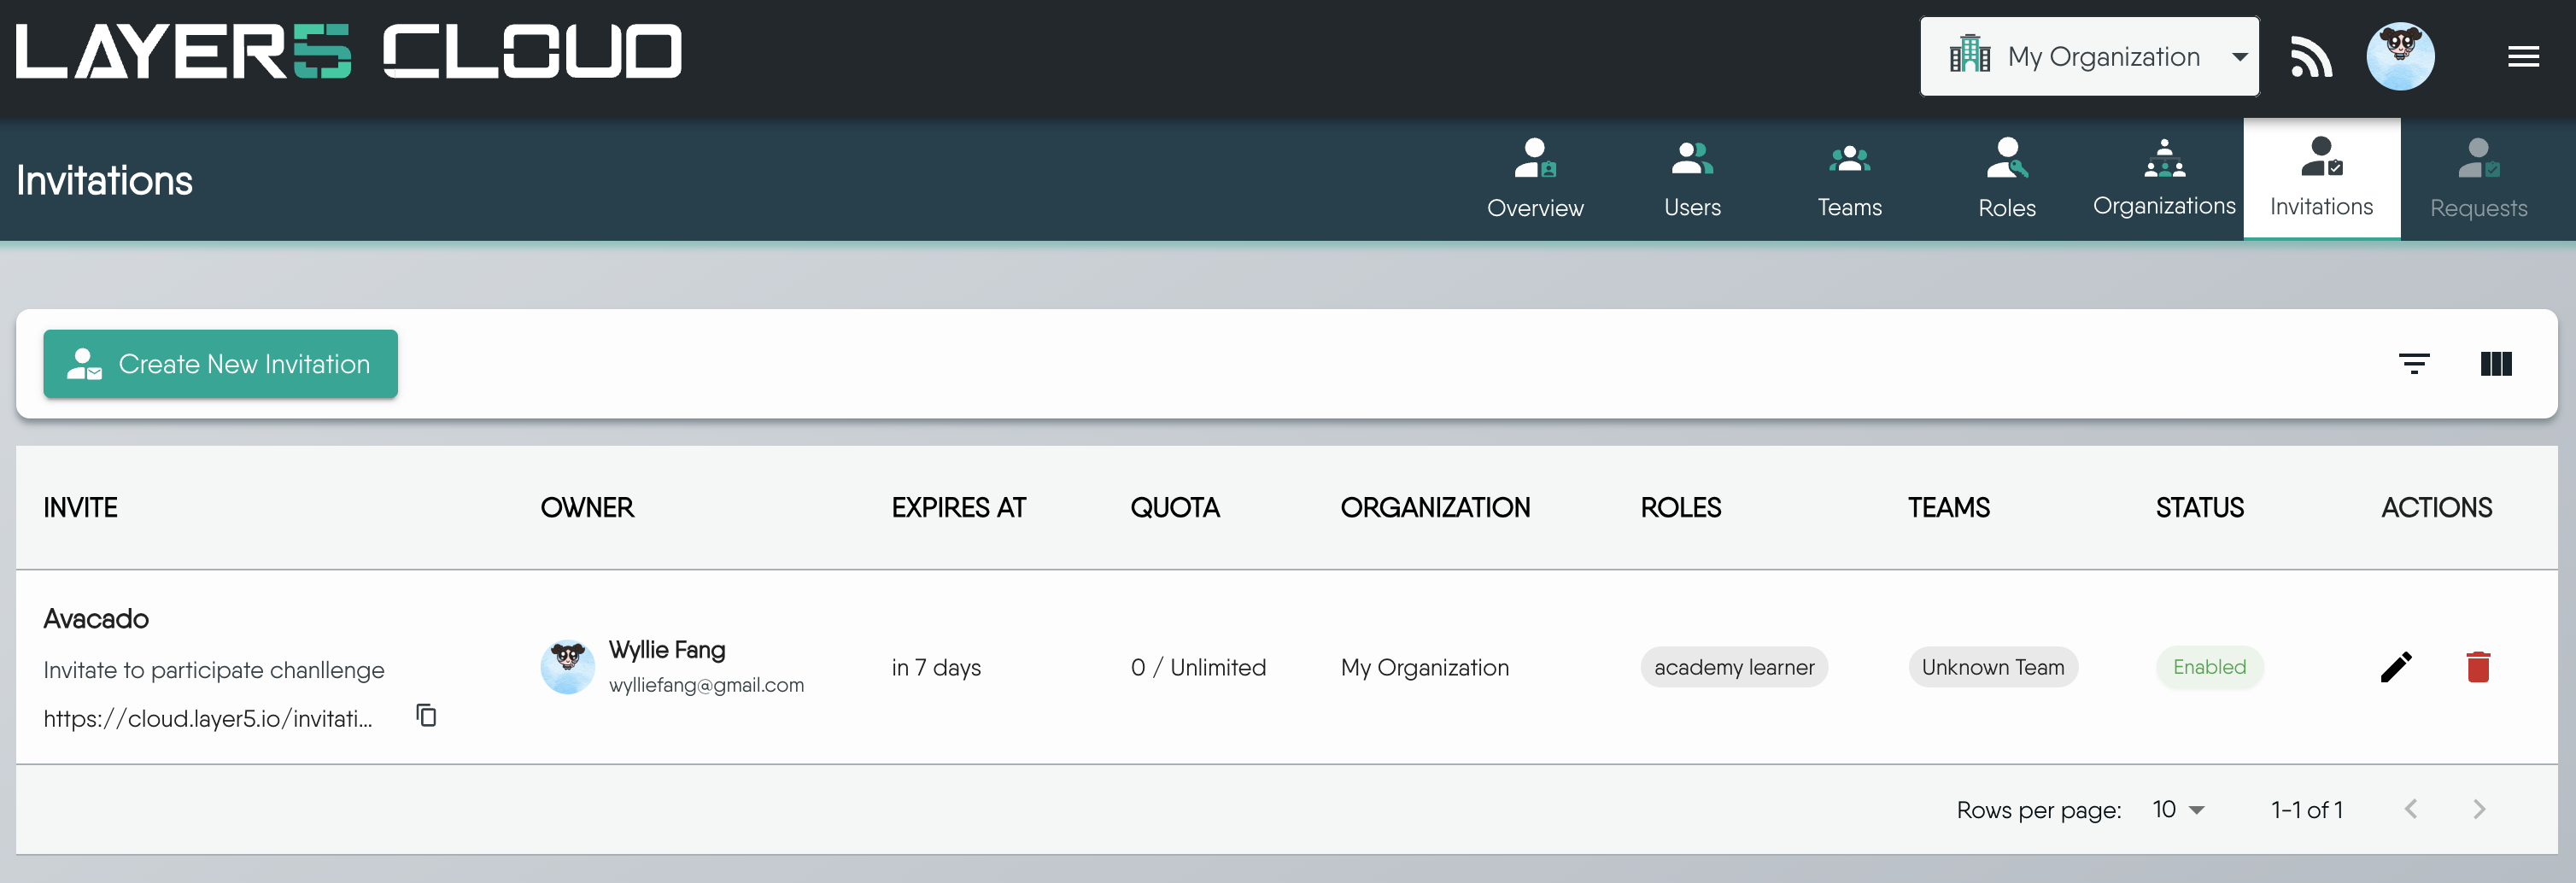
You can filter the list using the filter control at the top right of the table. Available filters are:
- **Status** — show only enabled or disabled invitations
- **Roles** — show invitations that grant a specific role
- **Teams** — show invitations that add members to a specific team
From the table you can perform the following management actions on each invitation:
* **Copy Link**: Click the copy icon next to the invitation URL to copy it for sharing.
* **Edit Invitation**: Click the pencil icon to open the edit dialog and modify any invitation properties.
* **Delete Invitation**: Click the trash icon to permanently remove the invitation. This action cannot be undone.
If another administrator deletes an invitation while your edit dialog is open, saving reports that the invitation was not found rather than reporting success. Close the dialog and reload the invitations table to see the current list. Whenever an edit cannot be saved, the dialog reports the specific reason it was refused.
### Tracking who has accepted an invitation
The **Quota** column in the invitations table always shows the number of users who have accepted an invitation alongside the configured limit — for example, `2 / 5` if a quota is set, or `2 / Unlimited` if no quota is configured. This lets you monitor uptake at a glance.
To see the individual users who are now members of the organization, navigate to the [User Management](/cloud/concepts/identity-and-security/users/user-management/) page. Members who joined via invitation appear there alongside their assigned roles.
### What happens when a user accepts an invitation
When a user clicks an acceptance link and is logged in, the system performs the following steps in order:
1. **Validates the invitation** — confirms it exists, is `enabled`, has not passed its expiration date, and has not exceeded its quota.
2. **Checks email eligibility** — verifies the user's email matches the invitation's `emails` list. An empty list allows any email (public invitation).
3. **Adds the user to the organization** — the user immediately becomes a member of the organization that owns the invitation.
4. **Assigns roles** — all roles configured on the invitation are assigned to the user in that organization. If no roles are configured, the user joins with no role.
5. **Adds the user to teams** — the user is added to all teams configured on the invitation.
Role and team assignment failures are non-blocking: the user is still added to the organization even if an individual role or team assignment fails.
### How the open signup invitation is applied at sign-in
The open signup invitation is not limited to first-time registration. It is applied whenever someone signs in through your organization's own address, such as its custom domain, on every sign-in method that address offers, including email and password as well as social sign-in. Someone who already has a Layer5 Cloud account and has never been a member of your organization becomes a member on that sign-in, with the roles and teams the invitation configures.
It is applied only to people who are not already members, which has two consequences worth knowing:
- **Roles and teams are never re-applied to an existing member.** If you remove a role or a team from someone who joined this way, signing in again does not restore it.
- **Each person is counted once.** Repeated sign-ins by the same person do not increase the invitation's acceptance count or add them to the organization a second time.
#### Invitation properties explained
| Property | Description |
| :--- | :--- |
| `emails` | List of email addresses or domain patterns allowed to use the invitation. Exact addresses (e.g., `user@example.com`) and domain patterns (e.g., `@example.com`) are both supported. If empty, the invitation is public. |
| `roles` | List of roles automatically assigned to new members upon accepting the invitation. If empty, the user joins with no role. |
| `teams` | List of teams new members are automatically added to upon accepting the invitation. |
| `quota` | Number that limits how many users can accept the invitation. If not set, there is no usage limit. |
| `expiresAt` | Date after which the invitation link can no longer be used. Does not affect existing members. If not set, the invitation never expires. |
| `status` | Invitation status: `enabled` = active and usable; `disabled` = inactive (can be re-enabled later). |
| `name` | A human-readable name used to identify the invitation. |
| `description` | Additional information about the invitation's purpose, for internal reference. |
| `isDefault` | When enabled, marks this invitation as the organization's open signup invitation. Users who register through your organization's registration page are automatically enrolled through this invitation, receiving the pre-configured roles and teams. Without a default invitation, the registration page does not automatically add users to the organization. Only one invitation can be designated as the default at a time — designating a new one clears the previous. Turning this setting on **or off** requires the **Manage Invitations** permission; editing any other property of an invitation does not, and leaves the setting as it was. |
### Managing existing invitations
All existing invitations are displayed in a table showing key details for each invitation: its name and description, a copyable acceptance link, the owner, expiration date, quota usage, assigned roles and teams, and current status.

You can filter the list using the filter control at the top right of the table. Available filters are:
- **Status** — show only enabled or disabled invitations
- **Roles** — show invitations that grant a specific role
- **Teams** — show invitations that add members to a specific team
From the table you can perform the following management actions on each invitation:
* **Copy Link**: Click the copy icon next to the invitation URL to copy it for sharing.
* **Edit Invitation**: Click the pencil icon to open the edit dialog and modify any invitation properties.
* **Delete Invitation**: Click the trash icon to permanently remove the invitation. This action cannot be undone.
If another administrator deletes an invitation while your edit dialog is open, saving reports that the invitation was not found rather than reporting success. Close the dialog and reload the invitations table to see the current list. Whenever an edit cannot be saved, the dialog reports the specific reason it was refused.
### Tracking who has accepted an invitation
The **Quota** column in the invitations table always shows the number of users who have accepted an invitation alongside the configured limit — for example, `2 / 5` if a quota is set, or `2 / Unlimited` if no quota is configured. This lets you monitor uptake at a glance.
To see the individual users who are now members of the organization, navigate to the [User Management](/cloud/concepts/identity-and-security/users/user-management/) page. Members who joined via invitation appear there alongside their assigned roles.
### What happens when a user accepts an invitation
When a user clicks an acceptance link and is logged in, the system performs the following steps in order:
1. **Validates the invitation** — confirms it exists, is `enabled`, has not passed its expiration date, and has not exceeded its quota.
2. **Checks email eligibility** — verifies the user's email matches the invitation's `emails` list. An empty list allows any email (public invitation).
3. **Adds the user to the organization** — the user immediately becomes a member of the organization that owns the invitation.
4. **Assigns roles** — all roles configured on the invitation are assigned to the user in that organization. If no roles are configured, the user joins with no role.
5. **Adds the user to teams** — the user is added to all teams configured on the invitation.
Role and team assignment failures are non-blocking: the user is still added to the organization even if an individual role or team assignment fails.
### How the open signup invitation is applied at sign-in
The open signup invitation is not limited to first-time registration. It is applied whenever someone signs in through your organization's own address, such as its custom domain, on every sign-in method that address offers, including email and password as well as social sign-in. Someone who already has a Layer5 Cloud account and has never been a member of your organization becomes a member on that sign-in, with the roles and teams the invitation configures.
It is applied only to people who are not already members, which has two consequences worth knowing:
- **Roles and teams are never re-applied to an existing member.** If you remove a role or a team from someone who joined this way, signing in again does not restore it.
- **Each person is counted once.** Repeated sign-ins by the same person do not increase the invitation's acceptance count or add them to the organization a second time.
A person can sign in successfully and still not join your organization. The open signup invitation is applied only when all of the following hold:
enabled.emails list. An empty list matches everyone.When one of them does not hold, someone who is not already a member signs in as a platform user with no membership and no roles in your organization, and no error is shown to them. Existing members are unaffected: they keep the membership, roles, and teams they already have. Check these four properties first when people who sign in at your organization’s address are not appearing under User Management.